Following on from the announcements on Monday at Ignite from the Project product group, there was a session today on the Project Home and Roadmap products. For those that missed the post on the announcements, here is a link to the blog post that has some notes around this: https://pwmather.wordpress.com/2018/09/24/microsoft-project-the-future-ignite-ppm-pmot-workmanagement-projectonline-projectmanagement/
In this blog post I will include some screen shots taken from Chris’ session today at Ignite and mention some of the features that Roadmap has. I wont talk about Project Home here as I already blogged about that previously: https://pwmather.wordpress.com/2018/08/20/new-projectonline-project-home-office365-ppm-ui-ux-msproject-fabricui/
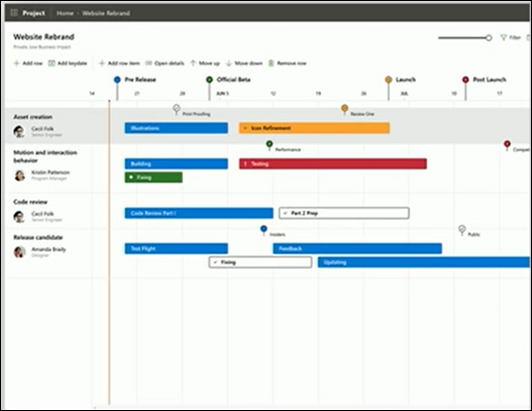
So Roadmap is the new product that is planned to be available early 2019. Roadmap is a product that enables organisations to visualise projects from various different tools in one timeline type view. On the first release it will support Project Online projects as well as Azure Board projects (formerly known as VSTS) with a view to supporting other types of projects in later releases such as Planner projects, new Project Service projects etc. To give you some context before we move on, here is a screenshot of a Roadmap from Chris’ slide deck today:
As you can see from the screen show about, each project is a row, each row has a name (free text – not the actual linked project name) and an owner (free select people picker from the the tenant users – not the actual linked project owner). Then in the details you can add tasks from the linked projects. On the timeline you can add key dates. You have full control over the order of the rows, move these up and down as you like using the Move Up and Move Down buttons.
Roadmaps will be created and accessed in the Project Home product, the Create New button in Project Home will contain the Roadmap option once released. This will load a blank canvas pretty much instantly. The roadmaps can be renamed at any time by clicking the name in the top left corner, that loads a Roadmap panel, here you also set the Roadmap owner:
To add a new project,firstly you would use the Add row button, type the name of the row and set the owner for the row. You can then connect the row to a Project Online project or an Azure Boards projects in the first release (more project type support to come later). When connecting a row to a project, firstly select whether it is a Project Online or Azure Boards project, then put the correct URL in for that service. Once connected to that service, you can start typing the name of the project you want to connect to then the list of projects will start to appear for you to select. You then connect to that project (using a Microsoft Flow in the background). You can then use the Add Row Item button with that row selected, that will open the add row items panel. Here you can start typing the names of the tasks you want to add then the list of tasks will appear for you to select. Once you have selected all of the tasks (you see a preview table of selected tasks with start and end dates in the row items panel) you then add those to that row. These will be linked to the source project, so as the data changes in the source project, Microsoft Flow will pick up the changes and update the synced data the Roadmap project row is using in the Roadmap common data service (CDS) database. Part of the Flow seen below:
Tasks in the roadmap can be given a status of either Unset Status, On Track, Potential Problems, At Risk or Done using the task card:
Setting the status will update the task bar on the Roadmap.
Key dates are added to the Roadmap using the Add key date button, this loads a pop to create the key date and set the status (same status options as tasks):
For Roadmaps with large numbers of projects added, you can filter by the row / project owner:
You also have a zoom control to change the zoom of the timeline.
Access to the Roadmap is controlled via the Office 365 Groups via the Roadmap interface, to add users click the Members button and type the users names:
So each Roadmap will get to make use of all the features Office 365 Groups enables such a SharePoint site, SharePoint document library, Shared Inbox, Calendars etc. Using Office 365 Groups means Roadmaps can either be private or public.
That’s is for now, but I’m looking forward to getting access to this!
Before I finish, another interesting slide Chris shared was the Platform one to give an idea of how things are architected (high level):
There are lots of exciting changes happening in Project!


