In the 5th part of the series on extending Project for the Web we will look at adding two more entities to the app and also a simple report created in Word. In part 4 we covered the Power Automate Flow that was used for the Risk to Issue escalation feature and also adding some new fields to the Project entity in the CDS. If you missed part 4 it can be found here: https://pwmather.wordpress.com/2020/01/06/extending-projectfortheweb-part4-ppm-cds-msdyn365-powerplatform-msproject-powerapps-powerautomate/
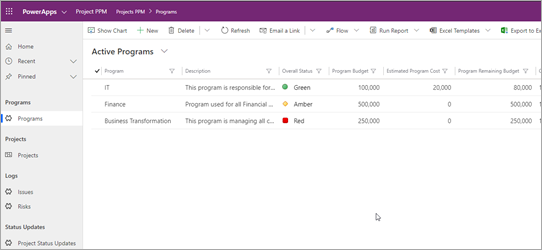
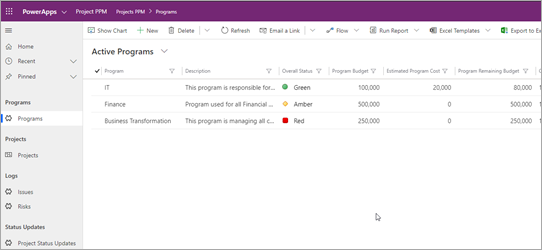
The updated app can see seen below with the new Program and Project Status Updates entities on the site map:
Accessing a program we can see the form:
Projects in this Program:
The Project entity has been updated to add the Program lookup field – this is displayed in the views and on the form:
Project form with the Program field and Status Updates tab:
Status Updates for this project:
And finally the Project Status Updates view:
There is also a Word export included:
I won’t go into step by step details for the Program and Project Status Updates as the concept is the same as pervious posts on extending the app – create the entity, add the fields, create / update the views and forms then update the app using the app designer. I will point out some key parts to the Program and Project Status Updates features. Starting with Programs, the Program entity was created first then edited the Project entity to add a new lookup field that used the Program entity to create the relationship between Program and Project:
The Program entity was then updated with some additional fields, “Estimated Program Cost” which was a rollup field to rollup the “Estimated Cost” field from the related Projects:
The “Program Remaining Budget” field was created as a calculated field that was set to “Program Budget” – “Estimated Program Cost”:
Icons were also added to the “Overall Status” field too:
This was done by adding the images as web resources, creating a simple JavaScript function and uploading that as a web resource then attaching it to the view – all documented here: https://docs.microsoft.com/en-us/powerapps/maker/common-data-service/display-custom-icons-instead
The Project Status Update entity creation is very similar to how Issues and Risks were created, create the entity, add the fields and include a “Related Project” field that is a lookup to the Project entity. The Project Status Update entity does have some fields that are not set by the users, these are “Status Update Sentiment Score”, “Sentiment Score Done?” and “Comment Positivity in %”. The sentiment score is calculated using a Power Automate Flow, this simple Flow uses the Detect Sentiment action to calculate how positive the “Status Update” is and sets the score and updates the record to indicated the scoring is complete:
There are two Flows, one to fire on the created event and one on the updated event. The update version just fires when the “Status Comment” is updated using the Attribute Filter:
The “Comment Positivity in %” is just a calculated field to give the % value:
Overtime you can see how positive or negative the project status updates were. That’s the two new entities summarised, next is to add them to the app. As before in previous posts, open the app in the App Designer and edit the Site Map:
In this example, two new groups were added, one for Programs and one or Status Updates. Then in the Programs group a new area was added that was linked to the new Program entity. In the Status Update group a new area was added that linked to the Project Status Updates entity. Nothing new here, the same steps that we have seen before in previous posts when Issues and Risks were added.
Now on to the Word template, this is new for my app so I will cover the high level steps here but for more details see the Microsoft docs here: https://docs.microsoft.com/en-us/powerapps/maker/model-driven-apps/templates-overview and here: https://docs.microsoft.com/en-gb/power-platform/admin/using-word-templates-dynamics-365
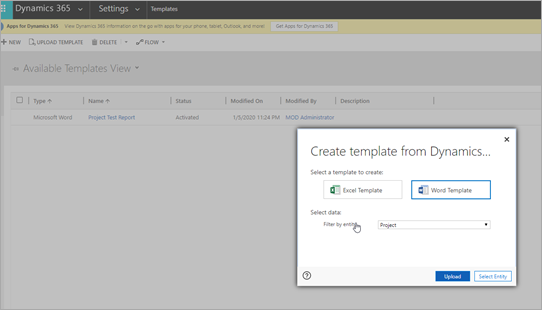
Access the Power Apps Advanced Settings > Templates and click New then select Word Template. Then select the Project entity:
Click Select Entity then select the other entities related to the Project entity for data which should be included / available in the Word template:
Then click Download Template, open the template file. Ensure the Developer tab is enabled in Word. On the Development tab click “XML Mapping Pane” and then select the CRM XML schema from the list. You will now see the Project entity:
Now build out the word template as required. My simple example template can be seen below:
The tables have the repeat control added to repeat the data where required (Tasks, Risks, Issues and Status Updates). Once finished, upload the template:
Now access the App, access a project and click Word Templates:
Click the template to generate the report:
That’s it for part 5, some more simple examples of how the Power Platform can easily be used to extend Project for the Web. Look out for part 6 coming soon with more feature examples using business process flows and business rules.


This is awesome and extremely efficient for us! We have some WBS with parent tasks. Are you aware of a way to group by parent tasks on a repeating table in the dynamics word template? Thank you again for taking the time to put these posts together! #D365 #ProjectForTheWeb #D365PSA @pwmather
I don’t know of a way to set up grouping / indentation for WBS type data on the repeating tables – might be worth posting a query on the Power Apps forum?